
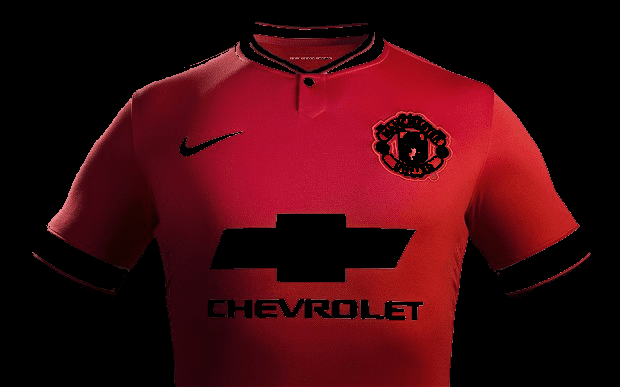
There are times when we unwittingly commit the same mistake incessantly without actually discovering the reason behind it because we never fathom that something of that sort can actually happen. One of the first hands-on application that fledgling Computer Vision enthusiasts start with is color detection. In color detection, we find the pixel locations whose values match our desired color values (and yes, OpenCV function cv2.inRange performs this task). In this tutorial, I will discuss about one of the many mistake that most newbies make. I did commit this peccadillo for a long time before I could figure it out. Making mistakes is not a mistake, but not correcting them is definitely. The philosopher in me, sometimes overpowers the engineer in me. Leaving me aside, in this blog post we will try to detect the Manchester United jersey in the image below using color detection and while doing so we will discover some absurd results. I have chosen the red jersey intentionally and you will figure it out why I did so as we go through this tutorial.
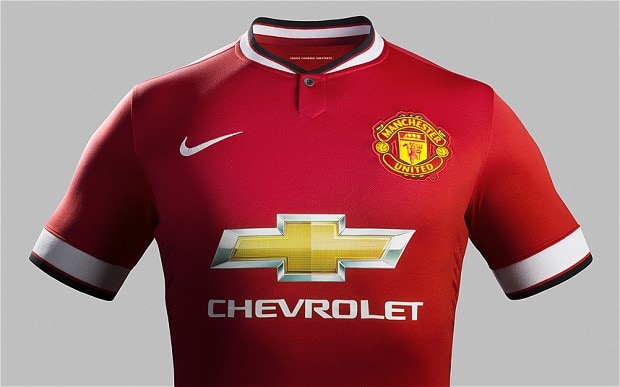
As you can notice, the jersey is predominantly red, so we will set the cv2.inrange function with the range of RGB values of red color. The code snippet below performs this task –
1
2
3
4im = cv2.imread("manu.jpg")
im_red_ball_mask = cv2.inRange(im, (0, 0, 30), (80, 80, 255))
im_red_ball_mask = im_red_ball_mask.astype('bool')
myShow("Resulting image with RGB values within (30-255, 0-80, 0-80)", im * np.dstack((im_red_ball_mask, im_red_ball_mask, im_red_ball_mask)))
In line 1, we read the image.The RGB value of true RED color is (255, 0, 0) but in real world images there is always variations in the image color values due to various lightening conditions, shadows and, even due to noise added by the camera while clicking and subsequently processing the image. So, in line 2 we set the range of red color values as (30-255, 0-80, 0-80). Any pixel value that lies in between these values is labelled as a red pixel in the output mask im_red_ball_mask. The mask values are either 255 or 0. 255 represents the red color pixels and 0 represents the pixels that are not red. In line 3, we change the data type of the mask to boolean as it will help us in displaying the image. Finally, in line 4, we display the image using the function named myshow. The myshow function is similar to cv2.imshow function. Since, I write code in IPython notebooks, I developed my custom display function as the usual cv2.imshow function does not work in IPython Notebooks. You can replace it by cv2.imshow, if you are not working in IPython Notebook. This is how the resulting image looks like –
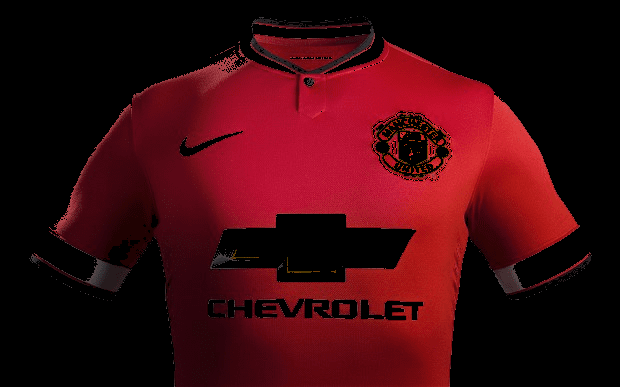
If you look meticulously, you will notice that there are some white pixels that have been incorrectly classified as red pixels. In order to remove these pixels, we will perform color detection in the HSV color space. Let’s convert the image into HSV color space using the cv2.cvtColor function.
Also Read: Best Laptops For Engineering Students In India
1im_hsv = cv2.cvtColor(im, cv2.COLOR_BGR2HSV)
The HSV values for true RED are (0, 255, 255) and to accommodate for variations as discussed above, we will consider a range of HSV values for the red color. So, we will use the cv2.inRange to generate the mask that has a value of 255 for pixels where the HSV values fall within the range (0-10, 100-255, 0-255) and a value of 0 for pixels whose values don’t lie in this interval. The mask values are either 255 or 0. 255 represents red color pixels and 0 represents non red color pixels. We will again convert this mask into boolean type and will then display the image using myShow function.
1
2
3im_red_ball_mask_1 = cv2.inRange(im_hsv, (0, 100, 0), (10, 255, 255))
im_red_ball_mask_1 = im_red_ball_mask_1.astype('bool')
myShow("Resulting image with Hue values within 0-10", im * np.dstack((im_red_ball_mask_1, im_red_ball_mask_1, im_red_ball_mask_1)))

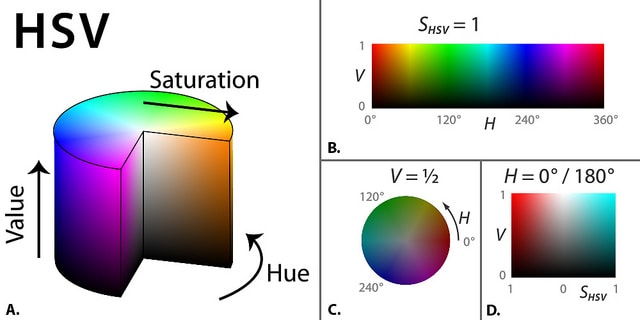
But what just happened!! Instead of improving, on the contrary our results deteriorated. The resulting image does not contains a major chunk of red pixels that were present in the previous image. The next thought that comes to mind is to tweak the HSV Values, but believe me that would not help. I am not being a pessimist here but there is an underlying idea that needs to be understood before trying anything new. The HSV color space unlike the RGB color space is a cylindrical color space (as shown in the image below). The Hue values are across a circle. So, after completing one rotation across the circle, we get the same color i.e. the Hue values at 0 and 360 (as shown in part B. of the image below) represent the same color which happens to be red. Just to avoid confusion w.r.t. to the diagram below – OpenCV uses HSV ranges between (0-180, 0-255, 0-255), and what you will find in most books and the diagram below is that the range of (0-360, 0-1, 0-1) is used to represent the entire gamut of HSV color space. So in OpenCV, the H values 179, 178, 177 and so on are as close to the true RED as H value 1, 2, 3 and so on.
So, I think you have grasped the concept quite well and by now, you would have guessed what we will do next. Yes, we will again use the cv2.inRange function but this time the range of Hue values will be between 170-180 instead of 0-10 used earlier. Here is the code for the new H range values –
Also Read: Best Processor Under 10000
1
2
3im_red_ball_mask_2 = cv2.inRange(im_hsv, (170, 100, 0), (180, 255, 255))
im_red_ball_mask_2 = im_red_ball_mask_2.astype('bool')
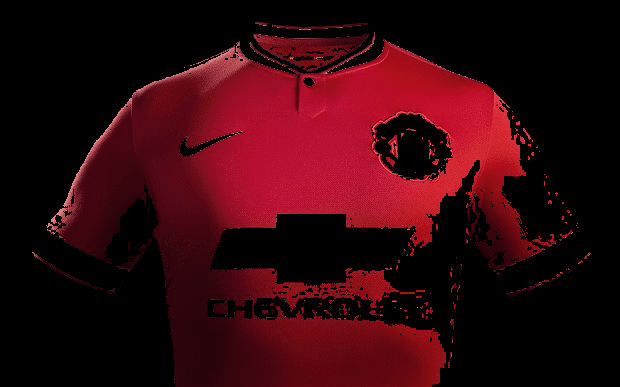
myShow("Resulting image with Hue values within 170-180", im * np.dstack((im_red_ball_mask_2, im_red_ball_mask_2, im_red_ball_mask_2)))
The resulting image looks like this –
That’s it, we have successfully recovered our missing red color pixels by using the new Hue values and have also negated the white noise pixels that we had while working with the RGB color space. Now, just for the sake of aesthetics, we will combine both the masks and then we will display the final image.
Also Read: Best Laptops Under 1 Lakh In India
1
2im_red_ball_mask_full = im_red_ball_mask_1 + im_red_ball_mask_2
myShow("Resulting image by adding both the masks", im * np.dstack((im_red_ball_mask_full, im_red_ball_mask_full, im_red_ball_mask_full)))
RECAP
In this blog post, I showed you how an oversight while setting the Hue values for red color can fail your code. We also discussed how to correctly set the range for hue values for red color. You will need to keep this in mind while working with HSL color space also. I hope you liked this blog post.