
Recently, I wanted to perform Face Recognition using OpenCV in Python but sadly, I could not find any good resource for the same. So, after a few hours of work, I wrote my own face recognition program using OpenCV and Python. The actual code is less than 40 lines of python code, thanks to the terse syntax of python and now, I am sharing with you what I did.
The whole process can be divided in three major steps –
The first step is to find a good database of faces with multiple images for each induvidual.
The next step is to detect faces in the database images and use them to train the face recognizer.
The last step is to test the face recognizer to recognize faces it was trained for.
So, let’s get started!
Database
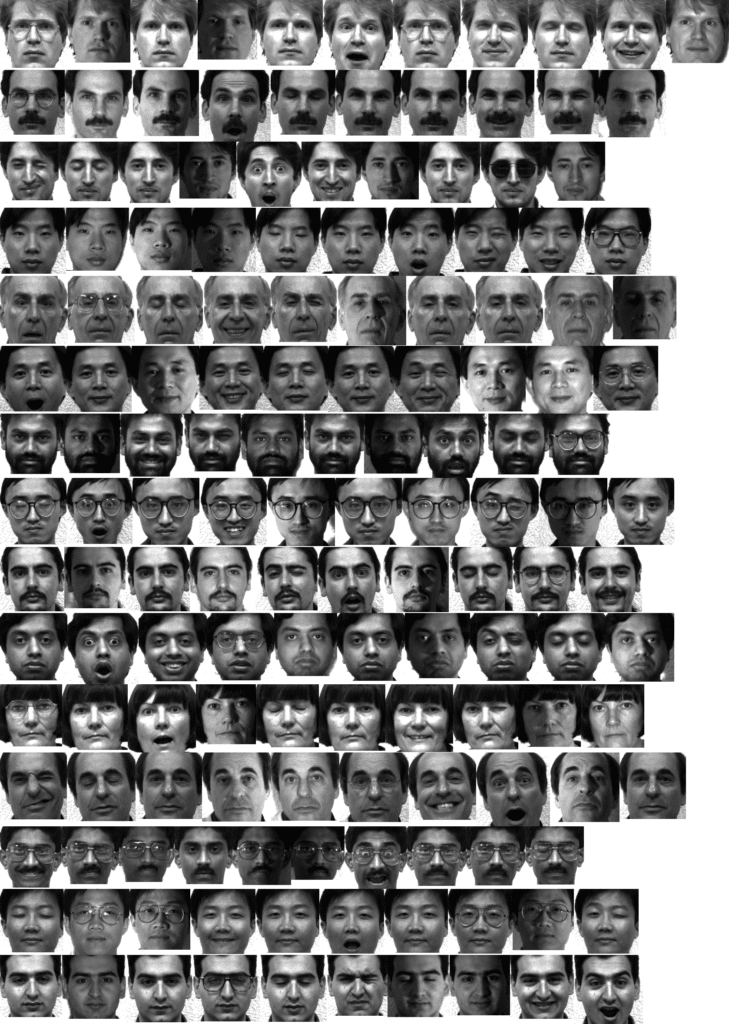
For this tutorial, we will use the Yale Face Database that contains 165 grayscale imagesof 15 individuals in gif format, There are 11 images for each individual. In each image, the individual has a different facial expression like happy, sad, normal, surprised, sleepy etc. Indeed, there are 166 images with 12 images for the first individual.
We will use this database by using 10 images of the total 11 images of each individual in training our face recognizer and the remaining single image of each individual to test our face recognition algorithm. The images corresponding to each individual are named like subject. where number ranges from 01, 02, 03…, 14, 15 and facial_expression is the expression that the individual has in the image. Here is how the images are named for individual numbered 05
subject05.centerlight
subject05.glasses
subject05.happy
subject05.leftlight
subject05.noglasses
subject05.normal
subject05.rightlight
subject05.sad
subject05.sleepy
subject05.surprised
subject05.wink
Note, there are 11 images for individual numbered 05. Similarly, for individual numbered 01
subject01.gif
subject01.glasses
subject01.glasses.gif
subject01.happy
subject01.leftlight
subject01.noglasses
subject01.normal
subject01.rightlight
subject01.sad
subject01.sleepy
subject01.surprised
subject01.wink
As I had mentioned earlier, there are 12 images for individual number 01. Out of the 11 images for each individual (12 for the first individual), we will not train the image with the .sad extension. We will use these images to test the face recognizer.
Also Read: Best LED Monitor Under 5000 In India
Implementation
Now, we have an understanding of how our database looks like and it’s time to start programming the face recognition algorithm.
Import the required modules
The first step is to import the required modules –
cv2– This is the OpenCV module and contains the functions for face detection and recognition.os– This module will be used to maneuver with image and directory names. First, we will use this module to extract the image names in the database directory and then from these names we will extract the individual number, which will be used as a label for the face in that image.Image– Since, the dataset images are in gif format and as of now, OpenCV does not support gif format, we will use Image module from PIL to read the image in grayscale format.numpy– Our images will be stored in numpy arrays.
4 import cv2, os
5 import numpy as np
6 from PIL import Image
Load the face detection Cascade
The first step is to detect the face in each image. Once, we get the region of interest containing the face in the image, we will use it for training the recognizer. For the purpose of face detection, we will use the Haar Cascade provided by OpenCV. The haar cascades that come with OpenCV are located in the /data/haarcascades> directory of your OpenCV installation. We will use haarcascade_frontalface_default.xml for detecting the face. So, we load the cascade using the cv2.CascadeClassifier function which takes the path to the cascade xml file. I have copied the xml file in the current working directory, so I have used the relative path. In case, you cannot locate the haar cascade file on your computer, I have included it in the zip file available for download at the bottom of the post.
Also Read: Best Processor Under 10000
 9 cascadePath = "haarcascade_frontalface_default.xml"
10 faceCascade = cv2.CascadeClassifier(cascadePath);
Create the Face Recognizer Object
The next step is creating the face recognizer object. The face recognizer object has functions like FaceRecognizer.train to train the recognizer and FaceRecognizer.predict to recognize a face. OpenCV currently provides 3 face recognizers –
- Eigenface Recognizer –
createEigenFaceRecognizer() - Fisherface Recognizer –
createFisherFaceRecognizer() - Local Binary Patterns Histograms Face Recognizer –
createLBPHFaceRecognizer()
We will use Local Binary Patterns Histograms Face Recognizer. So, let’s create the face recognizer –
recognizer = cv2.createLBPHFaceRecognizer()NOTE – As an aside, if you are interested in knowing how Local Binary Patterns Histograms are created and how they can also be used for texture matching, I would recommend you to go through my blog post on Texture Matching using Local Binary Patterns (LBP), OpenCV, scikit-learn and Python.
Create the function to prepare the training set
Now, we will define a function get_images_and_labels that takes the absolute path to the image database as input argument and returns tuple of 2 list, one containing the detected faces and the other containing the corresponding label for that face. For example, if the ith index in the list of faces represents the 5th individual in the database, then the corresponding ith location in the list of labels has value equal to 5.
16 def get_images_and_labels(path):
17     # Append all the absolute image paths in a list image_paths
18     # We will not read the image with the .sad extension in the training set
19     # Rather, we will use them to test our accuracy of the training
20     image_paths = [os.path.join(path, f) for f in os.listdir(path) if not f.endswith('.sad')]
21     # images will contains face images
22     images = []
23     # labels will contains the label that is assigned to the image
24     labels = []
25     for image_path in image_paths:
26         # Read the image and convert to grayscale
27         image_pil = Image.open(image_path).convert('L')
28         # Convert the image format into numpy array
29         image = np.array(image_pil, 'uint8')
30         # Get the label of the image
31         nbr = int(os.path.split(image_path)[1].split(".")[0].replace("subject", ""))
32         # Detect the face in the image
33         faces = faceCascade.detectMultiScale(image)
34         # If face is detected, append the face to images and the label to labels
35         for (x, y, w, h) in faces:
36             images.append(image[y: y + h, x: x + w])
37             labels.append(nbr)
38             cv2.imshow("Adding faces to traning set...", image[y: y + h, x: x + w])
39             cv2.waitKey(50)
40     # return the images list and labels list
41     return images, labels
In line 19, we are appending all the absolute path names of the database images in the list images_path. We, are not appending images with the .sad extension, as we will use them to test the accuracy of the recognizer. In line 21 and 23, we declare 2 list – images and labels. These are 2 list, that I had discussed in the previous paragraph that will be returned by the recognizer. In the list images, we append the region of interest containing the face and in the list labels, we append the corresponding label for that face. From line 24 – 38, we loop around each image to detect the face in it and update our 2 lists. So, in line 26 – 28 we load the current image in a 2D numpy array image. We cannot read the images directly using cv2.imread because as of now, OpenCV doesn’t support gif format images and unfortunately, our database images are in this format. So, we use the Image module from PIL to read the images in grayscale format and convert them into numpy arrays which are compatible with OpenCV. In** line 30, from the image name, we extract the individual number. This number will be the label for that face. **In line 32, we use CascadeClassifier.detectMultiScale to detect faces in the image. Although, in most cases, we need to tune the CascadeClassifier.detectMultiScale function to correctly recognize faces in the image, but for sake of simplicity, I am leaving this part to the default values. You can refer to this Real Python post for more insights on this. The CascadeClassifier.detectMultiScale function returns a list of faces. For each face it returns a rectangle in the format (Top-Left x pixel value, Top-Left y pixel value, Width of rectangle, Height of rectangle.). In lines 34-38, we slice the ROI from the image and append it to the list images and the corresponding label in the list labels. Once, we are done with this loop, we return the 2 lists in the form of a tuple.
Also Read: Best Gaming Laptops Under 35000 In India
Preparing the training set
We pass the get_images_and_labels function with the path of the database directory. This path has to be the absolute path. This functions returns the features (images) and labels (labels) which will be used to train the face recognizer in the next step.
42 # Path to the Yale Dataset
43 path = 'yalefaces'
44 # The folder yalefaces is in the same folder as this python script
45 # Call the get_images_and_labels function and get the face images and the
46 # corresponding labels
47 images, labels = get_images_and_labels(path)
48 cv2.destroyAllWindows()
The image below shows that detected faces for each individual. Row 1 contains the face images of individual 1, row 2 contains the face images of individual 2 and so on.
Perform the training
We perform the training using the FaceRecognizer.train function. It requires 2 arguments, the features which in this case are the images of faces and the corresponding labels assigned to these faces which in this case are the induvidual number that we extracted from the image names.
49 # Perform the training
50 recognizer.train(images, np.array(labels))
Testing the face recognizer
We will test the results of the recognizer by using the images with .sad extension which we had not used earlier. As done in the get_images_and_labels function, we append all the image names with the .sad extension in a image_paths list. Then for each image in the list, we read it in grayscale format and detect faces in it. Once, we have the ROI containing the faces, we pass the ROI to the FaceRecognizer.predict function which will assign it a label and it will also tell us how confident it is about the recognition. The label is an integer that is one of the individual numbers we had assigned to the faces earler. This label is stored in nbr_predicted. The more the value of confidence variable is, the less the recognizer has confidence in the recognition. A confidence value of 0.0 is a perfect recognition.
52 # Append the images with the extension .sad into image_paths
53 image_paths = [os.path.join(path, f) for f in os.listdir(path) if f.endswith('.sad')]
54 for image_path in image_paths:
55 predict_image_pil = Image.open(image_path).convert('L')
56 predict_image = np.array(predict_image_pil, 'uint8')
57 faces = faceCascade.detectMultiScale(predict_image)
58 for (x, y, w, h) in faces:
59     nbr_predicted, conf = recognizer.predict(predict_image[y: y + h, x: x + w])
60     nbr_actual = int(os.path.split(image_path)[1].split(".")[0].replace("subject", ""))
61     if nbr_actual == nbr_predicted:
62         print "{} is Correctly Recognized with confidence {}".format(nbr_actual, conf)
63     else:
64         print "{} is Incorrectly Recognized as {}".format(nbr_actual, nbr_predicted)
65     cv2.imshow("Recognizing Face", predict_image[y: y + h, x: x + w])
66     cv2.waitKey(1000)
From line 60-66, we check if the recognition was correct by comparing the predicted label nbr_predicted with the actual label nbr_actual. The label nbr_actual is extracted using the os module and the string operations from the name of the image. We also display the confidence score for each recognition.

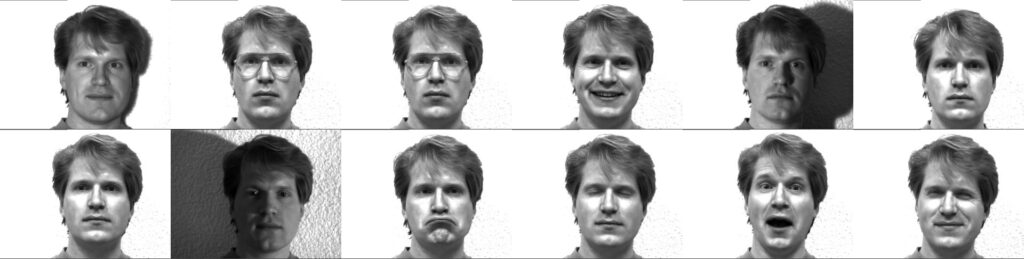
In the image above note that, individual number 4 is recognized with a perfect score because subject04.sad and subject04.normal are the same images. From the image above, we can see that our Face Recognizer was able to recognize all the faces correctly.
Recap
So, in this tutorial we performed the task of face recognition using OpenCV in less than 40 lines of python codes. The code above assigns a label to each image that is to recognized. But, what if the face to be recognized is not even in the database. In that case, the confidence score comes to our rescue. When, the face is not known by the face recognizer, the value of confidence score will be very high and you can use a threshold to ascertain that the face was not recognized.